Showing posts with label presentation. Show all posts

Tuesday, December 2, 2014

Discovery Education's Board Builder

Board Builder, a student and teacher tool found in Discovery Streaming, is a great way to deliver media content.  It is completely flexible and allows for creativity.  Think of presenting with a digital poster board.

Getting Started

To get started, log into your Discovery Streaming account:

Next, go to BUILDER TOOLS > BOARD BUILDER:
Select a theme:
Enter a TITLE and DESCRIPTION into the CREATE BOARD window and click CONTINUE:
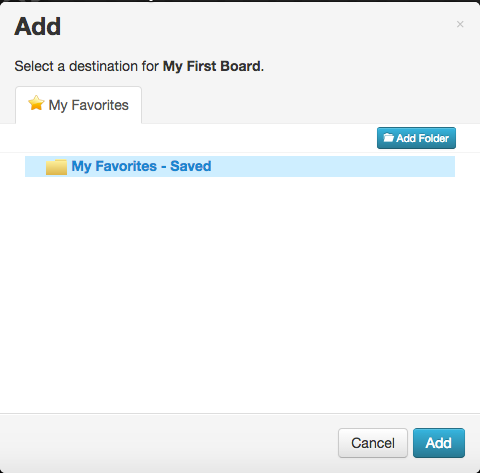
Select an existing folder or use the ADD FOLDER button to add a new folder and click ADD:
Text Objects

  1. Click a text object to enter text
  2. Click the PENCIL button to display the EDIT TEXT toolbar:

  3. Use the EDIT TEXT toolbar to format the text object:

Media Objects

Complete one of the following to insert media into a media object:
  1. Click SEARCH to search the Discovery media library, click the orange +ADD button, and click the ADD SELECTED RESOURCES button
  2. Click MY CONTENT to access and insert media already saved in your MY CONTENT area
  3. Click UPLOAD to upload your own media

Adding Attachments

NOTE: The maximum file size for attachments is 100mb and the maximum amount of files is five.

PERMITTED FILE TYPES:


  1. Click the UPLOAD button found in the attachment object to upload a file
  2. Click the ADD FILES button
  3. Navigate to the preferred file on your computer
  4. Repeat steps 2-3 above to add other files NOTE: The maximum file amount is five
  5. Click START UPLOAD
  6. Click DONE after the upload process is complete

Working with Objects

To move an object, click the object, hover over the grey top bar and drag and drop the object with the four-headed arrow mouse appearance:

Editor Tools

Use the Editor Tools to undo an action, redo an action, change the theme of the board, add items (such as Headlines, Textboxes, Media, and Attachments), apply text styles, change the foreground colors and patterns, and change the background colors and patterns.

Save and Share

Before logging out of Discovery Streaming, be sure to click thebutton found in the top, right corner.

In order for others to see the board, click thebutton and select SCHOOL, DISTRICT, DE COMMUNITY, or NOT SHARED:

Watch this 5 minute video by Kayla Steiner on how to create and share your teacher board.

Friday, September 19, 2014

Tackk


Tackk is a free web content creation tool that teachers will want to check out. Users can create flyers, presentations, projects, blogs, and lessons with this easy tool.

Tackk from Tackk on Vimeo.

To get started, create an account to save your tackks, then click the  button to select a template:
The Tackk editor walks users through the process of creating a personalized tackk.  Begin adding a visual with the ADD PHOTOS button.  Tackk searches the 500px site and inserts credit to adhere with copyright law.
A simple, yet effective, text tool can be used to insert content and multiple widgets including video, audio, buttons, selling and accepting donations, forms, RSVP submissions, and others can be embedded into a tackk.

Many other questions can be answered at the Tackk FAQ page.

Thursday, March 6, 2014

Photo Editors


While working with a great resource, Thinglink, I realized teachers may need a supporting resource if they do not have a Photoshop license when wanting to combine several images together into one.  Two free photo editing tools, Canva and PicMonkey, work well in conjunction with Thinglink (view my previous post here). The two photo editing tools allow users to create a collage and save the final image for uploading into Thinglink.


PicMonkey

It is not necessary to sign up for PicMonkey, but users may want to create an account and upgrade to Royale status for $33/year for additional features and an ad-free work environment.  Find help articles for PicMonkey here.  Copied below is an example of a collage created with PicMonkey.  The images were inserted by browsing my computer and then patterned papers were imported from the PicMonkey color swatches.

Canva

Canva can be used for much more than just collages.  Social media, presentations, blog graphics, facebook covers, documents, and cards can all be created in Canva and helpful templates are supplied for the user needing a creative push.  Sign up for Canva here and find help articles here.  Below is an example of what I made with Canva when combining several app images I had on my computer.  The text graphics and background pattern were imported from the Conva library.  View their promo video here.


After adding links to the image in ThingLink:
Note the small circle tags that indicate links.

Tuesday, August 6, 2013

Haiku Deck


Haiku Deck is a free presentation app with a vast gallery of royalty-free graphics which make for an impressive, visually appealing presentation.  Although Haiku Deck is intuitive and simple to use, the tutorials provided on the blog can be helpful to students and teachers.  To create a presentation, follow the steps found here:
  1. Create an account within the app
  2. Begin a Haiku Deck with a title and theme
  3. Start a slide by inserting text and graphics
    Note: Images can be added from the app's search feature or imported via Facebook, Instagram, Dropbox, Flickr, Picasa, Google Drive, or Box
  4. Save and share the presentation via Facebook, Twitter, or the Haiku Deck website
A great feature Haiku Deck just added a few months ago was the charts option. Users can insert a bar, pie, or stat chart to a slide. View directions here.


Below is a great 7 minute video on how to get started using Haiku Deck:


Below is my attempt at a Haiku Deck showing my family's San Antonio trip from the summer: